How to Place the Specimen Accurately On Co-Efficient Of Friction Tester?

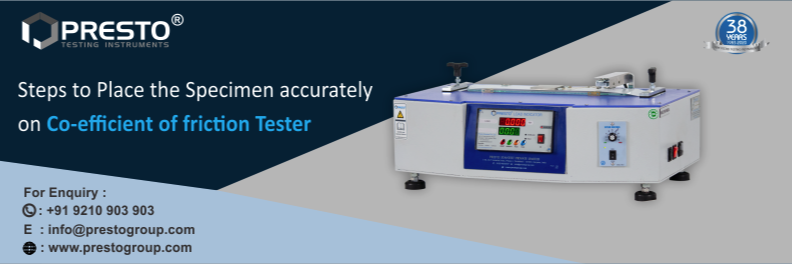
If you are working in a plastic film testing industry, then testing the coefficient of friction of these materials is of utmost importance in order to quantify and compare the frictional surface properties of materials. Presto Co-Efficient of Friction Tester – Digital reveals the stackability of plastic films. It helps prevent accidents due to friction in packaging, loading, transportation of materials, etc. Friction could result from uneven film thickness, which leads to uneven film strength. Therefore, it is important for you to test the friction of materials in order to protect the content from damage.
Here in this blog, we are going to provide you with brief information about this lab testing equipment and how you can easily place the specimen accurately on this lab testing machine. So, let us get started.
What is the co-efficient of friction tester and for what purpose it is used?
In the flexible packaging film industry, the manufacturers will focus more on evaluating the quality of plastic films and checking the friction in them. This is because the friction present in the package will tend to destroy the package during transportation, shipping, or stacking of products. We at Presto will provide you with reliable testing instruments that will reduce your product delivery errors and let you gain more profits from customers.
When two surfaces will slide over one another then it causes a co-efficient of friction. If this dimensionless property of the material is low then it indicates that the surfaces are a sticker. This will eventually result in less resistance to sliding motion. With the help of our lab testing equipment, you can easily assess the slipping properties of films.
Features of co-efficient of friction tester
The Presto co-efficient of friction will help you to analyze the optimal slip properties of materials that are different from their applications. For instance, when the plastic film will pass over the HFFS fin wheel deck plates, then it will have low outside friction i.e. the film to metal. It will be helpful in preventing drag and film jams. The filled packages will also get stuffed into the corrugated box will possess low outside friction. Thus, in these types of situations, the product can easily be tested for coefficient of friction.
Here are the features you will get with the use of this standardized testing equipment:
- Clamps are provided to attach samples to the glass slab.
- Safety switches are provided at the end surface to stop the motion of the load cell along with the weight.
- Gives both dynamic and static friction.
- Speed regulating knob.
- Digital display for both kinetic and dynamic friction.
- Calibrated in accordance with ISO norms, Calibration Certificate provided traceable to (NABL).
- Helps to determine both static and kinetic friction.
Technical Specifications of co-efficient of friction tester
- Outer Body Construction: Mild Steel, Powder Coated
- Sample Mounting Construction: Stainless steel with glass mounting
- Load Cell Capacity: 5Kgf
- Motor: Single phase, ¼ H.P
- Display for load: Dual Display- Digital and Computerized
- Block: Weight, Dimension, Thickness: 200gm, 63.5 x 63.5 mm, As per Load
- Speed: 150±30mm/min
- Standards: ASTM D1894, ASTM D202, ASTM D4918, ISO 8295 and TAPPI T815
- Power Supply: 220 V AC, 50 Hz, Single Phase Power Supply
- Safety: Limit Switch
- Weight of slide Clamp: 200g
- Accuracy: 2.5%
- Least Count: 1g
With these features and technical specifications, you can easily conduct the test accurately and get test the coefficient of friction of your products.
Now, let us focus on the easy-to-follow steps to place the specimen accurately on this testing machine.
Easy to follow steps that help you to place the specimen accurately on co-efficient of friction tester
Whenever you are ready to conduct the test with the help of a co-efficient of friction tester, then you need to prepare the specimen first. After that, you need to place that specimen accurately on this lab testing instrument. To make sure you accurately place the specimen on this testing machine, you need to follow the below-mentioned steps.
- Place the test sample on the glass slab.
- Tighten the sample across the glass slab with the help of fly screws attached to the corner.
- The sample should be placed straight on the mounting surface without any loops/ Wrinkle-free.
- Take the slide block to the extreme left using the toggle switch.
- Now attach the test block to the slide block with the help of a string in such a manner that the load cell must not touch the fly clamp.
In this way, you can easily place the testing sample in the co-efficient of friction tester and conduct the test accurately. You can also get information about Composite Films Testing Instruments. To know more information about its pricing, working, or want to have a FREE sample testing session, give us a call at +91 9210903903 or email us at info@prestogroup.com. Our technical experts will help assist you well regarding all your queries or needs.
you may also like
- Safeguard Sensitive Products from Repetitive Movement by the Vibration Table
- Eliminate Excessive Moisture by Measuring It with the Moisture Meter
- Determine the Mechanical Properties of Plastic Materials with the UTM Machine
- How to Conduct Tensile Tests & Calibration on the Tensile Strength Tester?
- Evaluate Pressure Sustainability of Packets & Pouches with Vacuum Leak Tester
Recent News
- Paper & Packaging Testing Instruments
- Paint, Plating & Coating Testing Instruments
- Plastic & Polymer Testing Instruments
- Environmental Testing Chambers
- PET & Preform Testing Instruments
- Color Measuring Testing Instruments
- View Entire Range Instruments

Catalogue 2023
Get information about new product launches, research, innovation and endeavors at Presto.
download Free Copy
Quick quote

